Shower Door Dimensions: A Practical UK Sizing Guide
Shower door dimensions explained for UK bathrooms. Cover typical sizes, clearances, hinge and sliding allowances, and how to measure for a clean install.

You can spot the job site before you step in. The homeowner has already ordered a sleek 1100 mm pivot door online, the tray is still bare, and the bathroom is a tight Victorian room where the toilet, basin, and the doorway all compete for the same few inches. That's when the question isn't “what size door do I need”, it's what finished opening, what swing, and what clearance are left afterwards.
A shower door only works when it fits the room after the tile is on, the floor falls are set, and the fittings are in place. The catalogue number is just one part of the job, and often not the most important one. In practice, the safest way to judge shower door dimensions is to work backwards from the finished wall-to-wall opening, not forwards from the product brochure.
Why Shower Door Dimensions Start With the Room
A good survey starts with the room, not the enclosure. In a Folkestone terrace, I'll often find a homeowner has measured the tray size, then stopped there. That's the wrong order, because the tray doesn't tell you what the walls do, where the door can swing, or whether a screen will leave enough room to move past the basin.
Start with the finished opening, not the glossy spec
The practical sequence is simple. First, establish the finished internal width between tiled walls. Then check the tray or wet-room former, because a nominal enclosure size can shrink once wall finishes, waterproofing build-up, and fixings are included. A 1200 mm enclosure can deliver less usable space if that figure is measured externally rather than internally, and that matters more than most product pages admit.
The same applies to door type. A hinged door might technically fit the aperture, but if it steals the only route to the WC, the room becomes awkward immediately. A pivot or sliding door can save floor space, but only if the rest of the layout still works around it.
Practical rule: measure the room first, then choose the door. The biggest advertised width is often the wrong starting point.
For planning mirrors, lighting, and the feel of the room, the layout has to stay coherent as a whole. If you're thinking about the wider bathroom finish as well, the same discipline applies to details like illuminated bathroom mirrors, which also need to be placed around real clearances, not just on a sketch.
Standard Shower Enclosure Sizes in the UK
Most domestic shower enclosures fall into a handful of familiar footprints. The ones I see most often are 760 × 760 mm, 800 × 800 mm, 900 × 900 mm, and rectangular formats such as 900 × 760 mm, 1000 × 800 mm, 1200 × 800 mm, and 1200 × 900 mm. Those numbers are useful, but only if you know whether they refer to the tray, the frame, or the clear internal glass-to-glass space.
A 760 × 760 mm enclosure is the tight end of the scale, while 900 × 900 mm gives a much more comfortable showering area. Rectangular options usually make better use of long narrow rooms, especially where a square footprint would waste wall length. The key task is to compare the nominal footprint with the actual usable space once the enclosure is installed.
| Common UK Shower Enclosure Sizes | Internal area (approx.) | Typical door width | Best fit |
|---|---|---|---|
| 760 × 760 mm | Compact | Narrow | Very tight bathrooms where space is limited |
| 800 × 800 mm | Compact to standard | Narrow to moderate | Small domestic showers with careful layout |
| 900 × 900 mm | More generous | Moderate | Better movement and easier daily use |
| 900 × 760 mm | Compact rectangular | Narrow to moderate | Narrow rooms where one side can be longer |
| 1000 × 800 mm | Medium | Moderate to wide | Better comfort in family bathrooms |
| 1200 × 800 mm | Large rectangular | Moderate to wide | Wider alcoves and walk-in style layouts |
| 1200 × 900 mm | Large | Wide | Spacious showers where comfort matters most |
Check what the dimension actually measures
Buyers often get caught out here. Some products are measured externally on the frame, while others quote the internal glass size. That difference changes the usable showering area and can decide whether the door lands cleanly on the tray or clashes with the tile line.
In a real install, I trust the finished wall-to-wall measurement more than the headline brochure figure. If the room is being refitted, the safest move is to wait until the wall build-up is known, then order to suit the final opening rather than the tray size alone.
Hinged, Pivot, Sliding and Bi-Fold Doors Compared
Door type should be chosen by clear opening width and required swing area, not by how broad the glass looks in a photo. A wide-looking panel can still leave you squeezing through a narrow gap if the frame, seals, or pivot hardware eat into the entry. That's why the same nominal width can feel generous in one bathroom and restrictive in another.
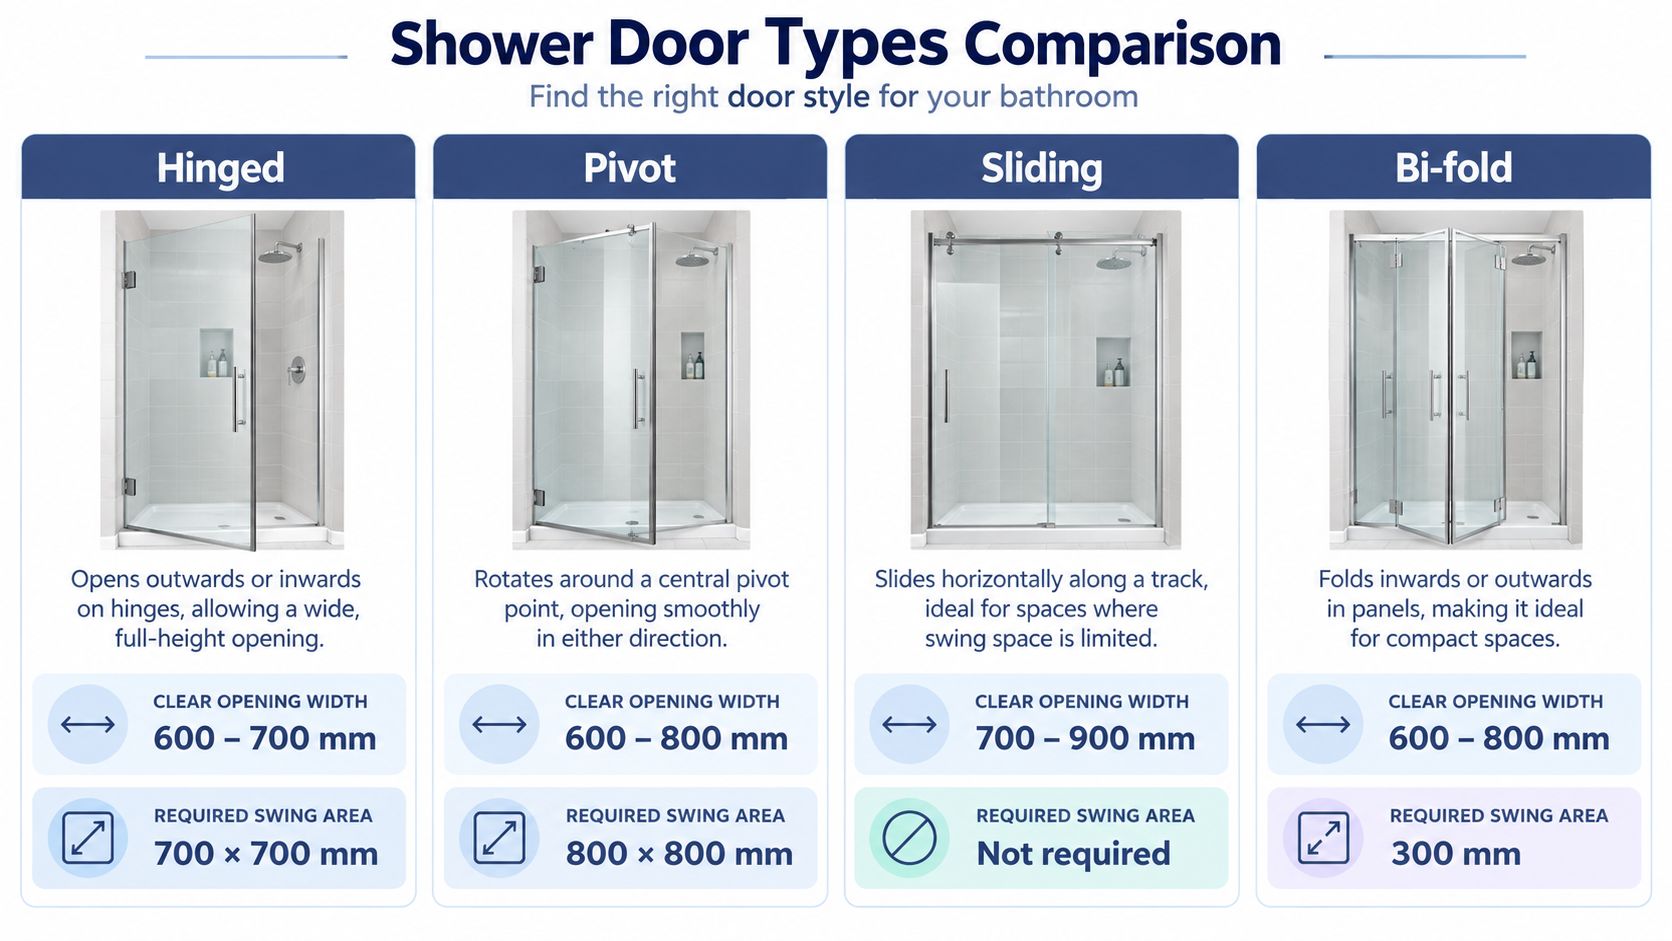
What each style really gives you
Hinged doors usually give the biggest clear opening, but they need an arc of free floor space. If the door opens into a basin run, a radiator, or the only circulation route, the benefit disappears fast.
Pivot doors reduce the swing demand compared with a simple hinged leaf, but they still need careful planning because the fixed panel and pivot position can narrow the usable entry.
Sliding doors are the strongest choice when the room is tight and you want to avoid swing clearance altogether. The trade-off is that the walk-through opening is still only part of the total door width, so the entry can feel narrower than the glass span suggests.
Bi-fold doors fold back into themselves and suit compact spaces where a full swing would fail. They can work well, but the hinge alignment has to be accurate, or the closing action feels clumsy and the seals don't sit properly.
| Door type | Clear opening behaviour | Space it needs | Best use case |
|---|---|---|---|
| Hinged | Often the widest entry | Swing arc in the room | Bigger bathrooms with free floor space |
| Pivot | Broad but controlled entry | Reduced, but still real, swing demand | Balanced layouts with enough clearance |
| Sliding | Entry without outward swing | Minimal floor clearance | Small bathrooms and tighter plans |
| Bi-fold | Decent entry from a compact panel | Very little projection | Space-saving installs where swing is impossible |
The wrong question is “which door looks biggest”. The right one is “which door leaves the room usable once it's fitted”.
Measuring the Finished Opening Correctly
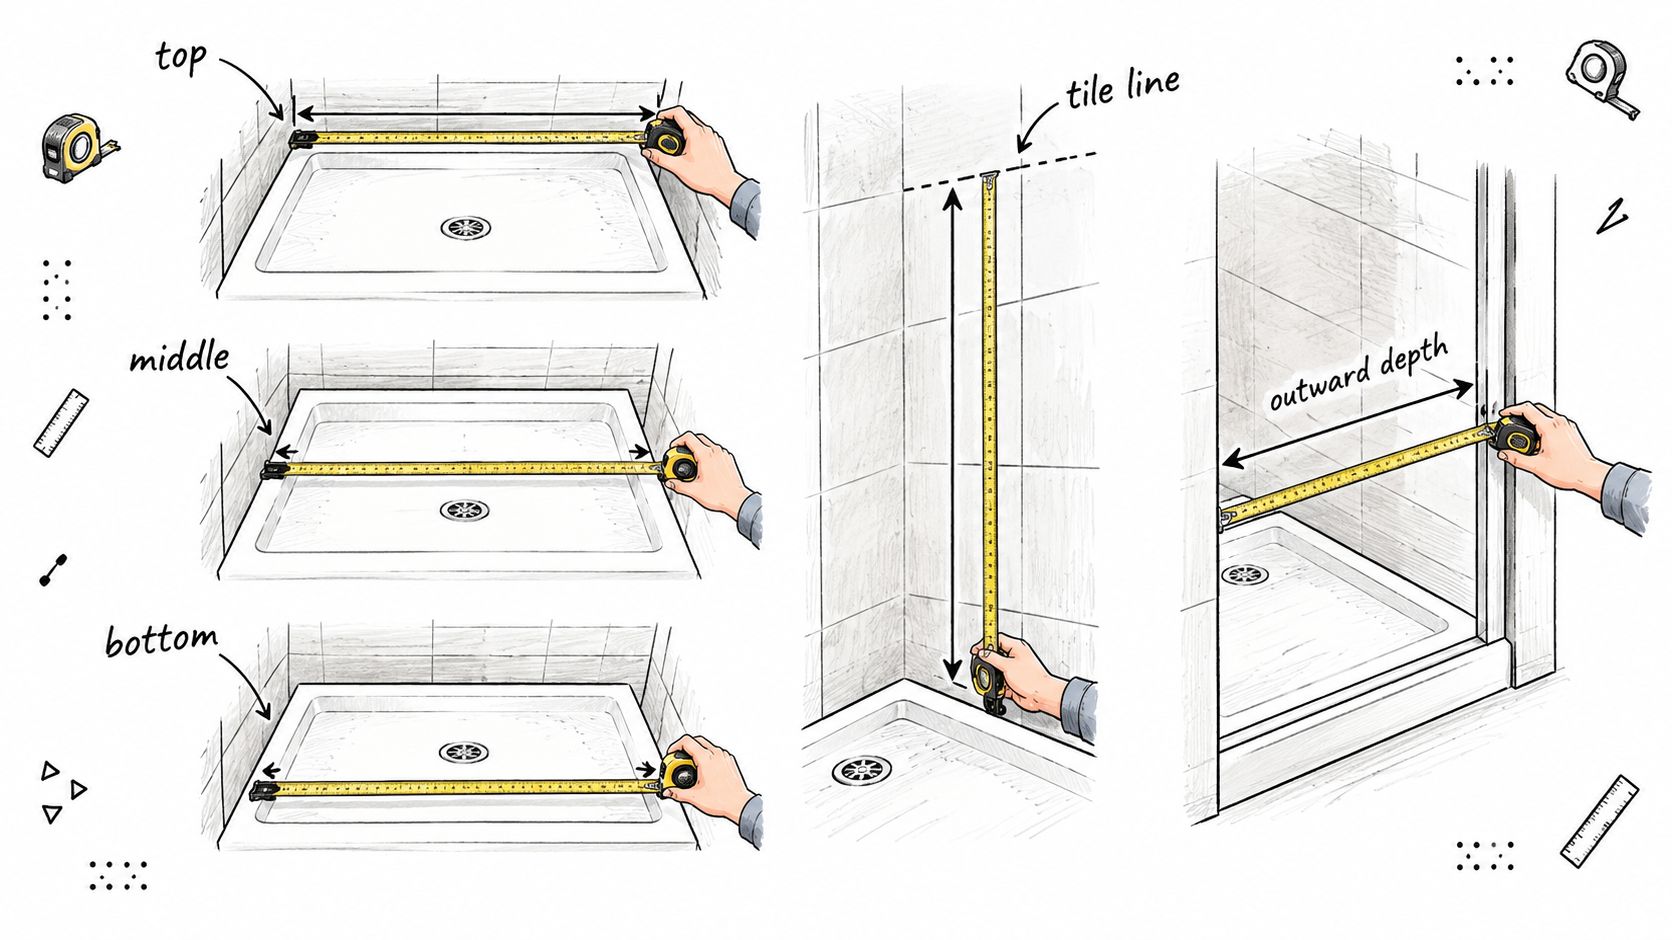
The first three measurements I want on site are the width across the top, middle, and bottom of the opening. If those figures don't agree, the walls are out of true, and the smallest reading usually governs the fit. That's the difference between a clean install and a door that binds, leaks, or leaves a visible gap.
The second measurement is the vertical height from the tray or former up to the planned tile line. That tells you whether the screen, frame, or fixed panel will meet the build exactly where it should. The third check is outward into the room, because even a perfect enclosure can fail if the door can't open freely.
The three traps that catch people out
Out-of-true walls shrink the effective opening. Tile thickness adds width the tray doesn't have. Tray lip height changes how you judge the threshold and the seal line.
For a supplier, the useful question is not “what size tray is it”, but “what is the finished opening after tiling, and what tolerance range does the door allow”. That's the number that decides whether the enclosure lands cleanly or needs a compromise.
Before the video below, keep in mind that a straight measurement isn't enough if the room itself is pinched.
Clearances the Door Has to Leave Around It
A shower door doesn't live in isolation. It sits inside a room that still needs a route to the basin, a WC approach, a place to dry off, and, in many cases, a turning space that can't be broken by a door leaf or handle. If the door takes that space away, the enclosure may be “correct” on paper and still wrong in practice.
UK guidance for accessible bathrooms brings this into sharp focus with a 1500 mm turning circle and the need for unobstructed circulation around the fittings. In real life, that means the swing line, handle projection, and frame depth all matter as much as the glass width. A good-looking door that crosses the only passage to the basin can ruin an otherwise workable layout.
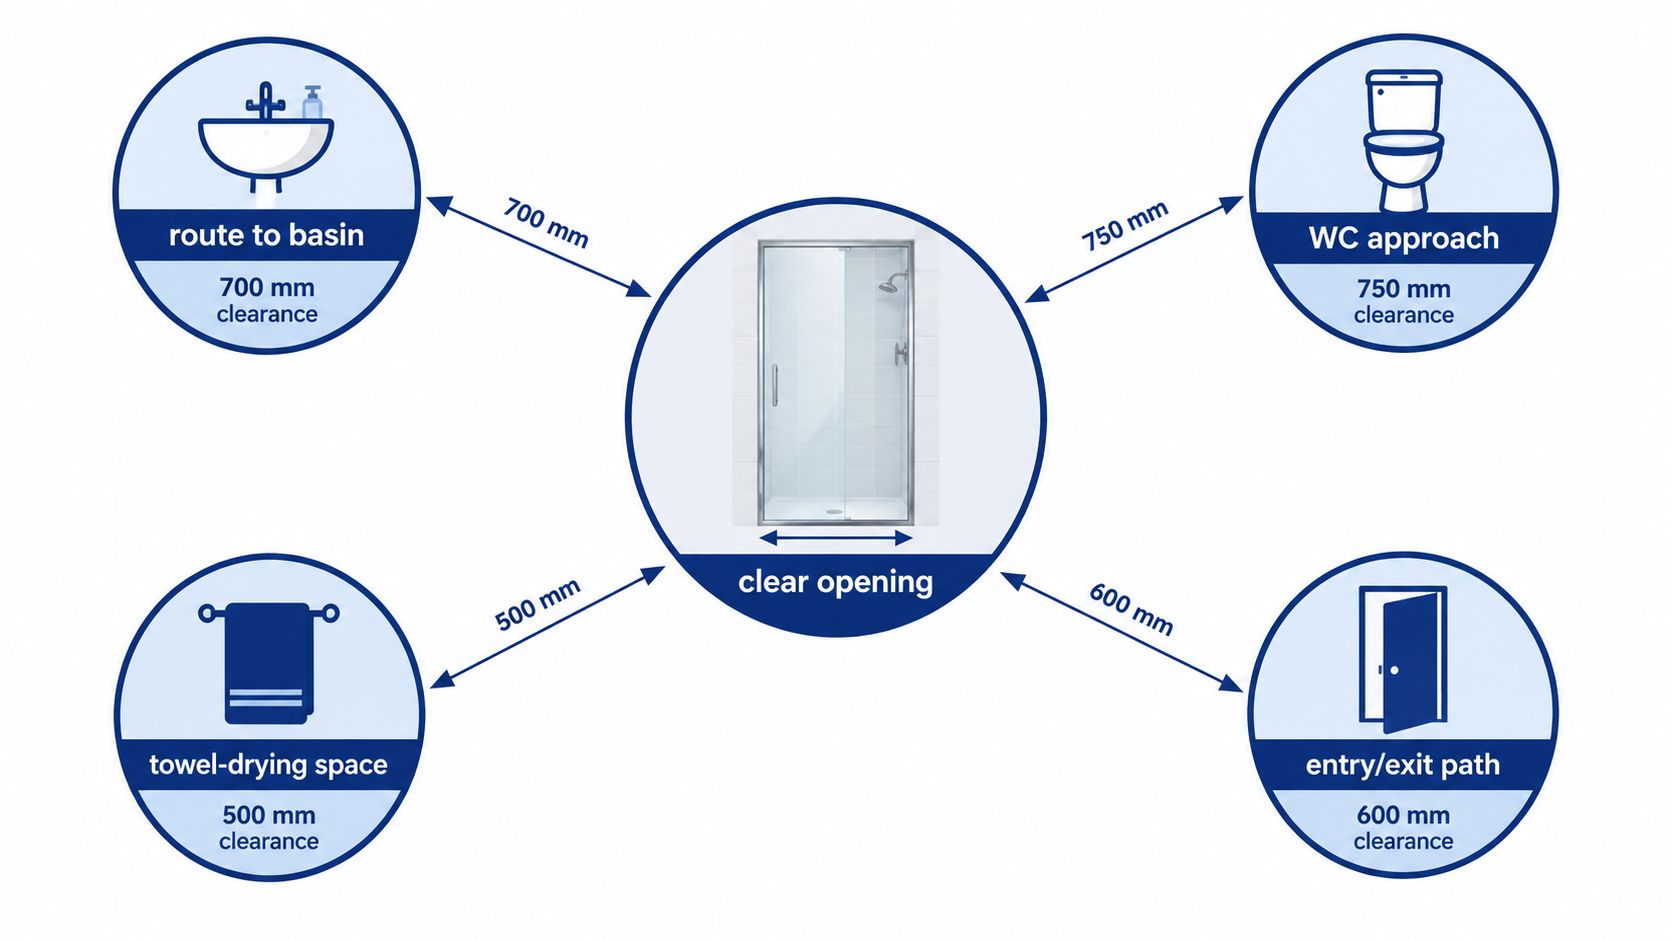
Think in routes, not just inches
I like to sketch three paths on the plan. One is the path into the shower. The second is the path to the basin or WC. The third is the turning zone, especially if the bathroom may ever need to support assisted use.
If a hinged door crosses the only route, it's usually the wrong configuration, even if the door itself is technically within spec. A sliding door or well-placed fixed panel often keeps the room calmer because it protects circulation space. That's especially true in compact layouts where every projection starts a conflict.
Keep future fittings in mind
Grab rails, shower chairs, and carer access all depend on free wall and floor space. Once the screen is installed, it becomes a permanent object, so its footprint needs to be judged against how the bathroom might be used later, not just how it works on day one.
A door that fits the opening but blocks the room is not a successful fit.
Allowing for Tiles, Build-Up and Wet Room Falls
Many measurements go wrong here. The bare tray never equals the finished opening, because tiles, adhesive, waterproofing, and floor build-up all change the actual dimensions. If you specify from the unmade shell, you're guessing.
A useful habit is to work from the finished wall face outward. The door should be ordered after tile thickness, backing boards, and any waterproofing build-up are known, because those layers shift the glass line and can tighten the adjustment range. In a wet room, the fall in the floor also changes how the threshold feels and how the bottom seal lands.
A simple way to avoid a bad order
Measure after the substrates are fixed. Measure again after tiling if possible. Then compare the final number with the manufacturer's adjustment range rather than relying on the nominal tray size.
A bare 900 mm tray can become a slightly different finished opening once tile and adhesive are in place, and that small change can matter if the enclosure only has a narrow adjustment band. The principle is simple, the execution isn't always tidy, and that's why off-the-shelf assumptions cause trouble.
If you're dealing with a shower that has started to move, crack, or leak around the base, it's worth checking the tray and surrounding build before you blame the door. A failed base can make a perfectly sound screen look like the problem, which is why a separate check for leaking shower tray issues often saves time on site.
Accessible and Future-Proof Shower Door Sizing
Accessible design starts with clear floor area, not with a decorative screen choice. For a wheelchair-friendly bathroom, the 1500 mm clear turning circle is the anchor point, and that space must stay free of low-level obstructions. Approved guidance also identifies an accessible shower area of 1200 × 1200 mm in England, with 1000 × 1000 mm permitted in some bathroom and cloakroom situations, and a minimum clear door opening of 775 mm in the referenced dwelling guidance, while other Part M applications use 850 mm, so the building type has to be confirmed before you commit.
That means the “best” door is often the one that interferes least with the room. An outward-opening or sliding screen usually works better than an inward swing because it preserves transfer space and doesn't trap the user inside the enclosure. If an inward-opening door is used in a wheelchair-adaptable bathroom, it has to be capable of being rehung to open outwards.
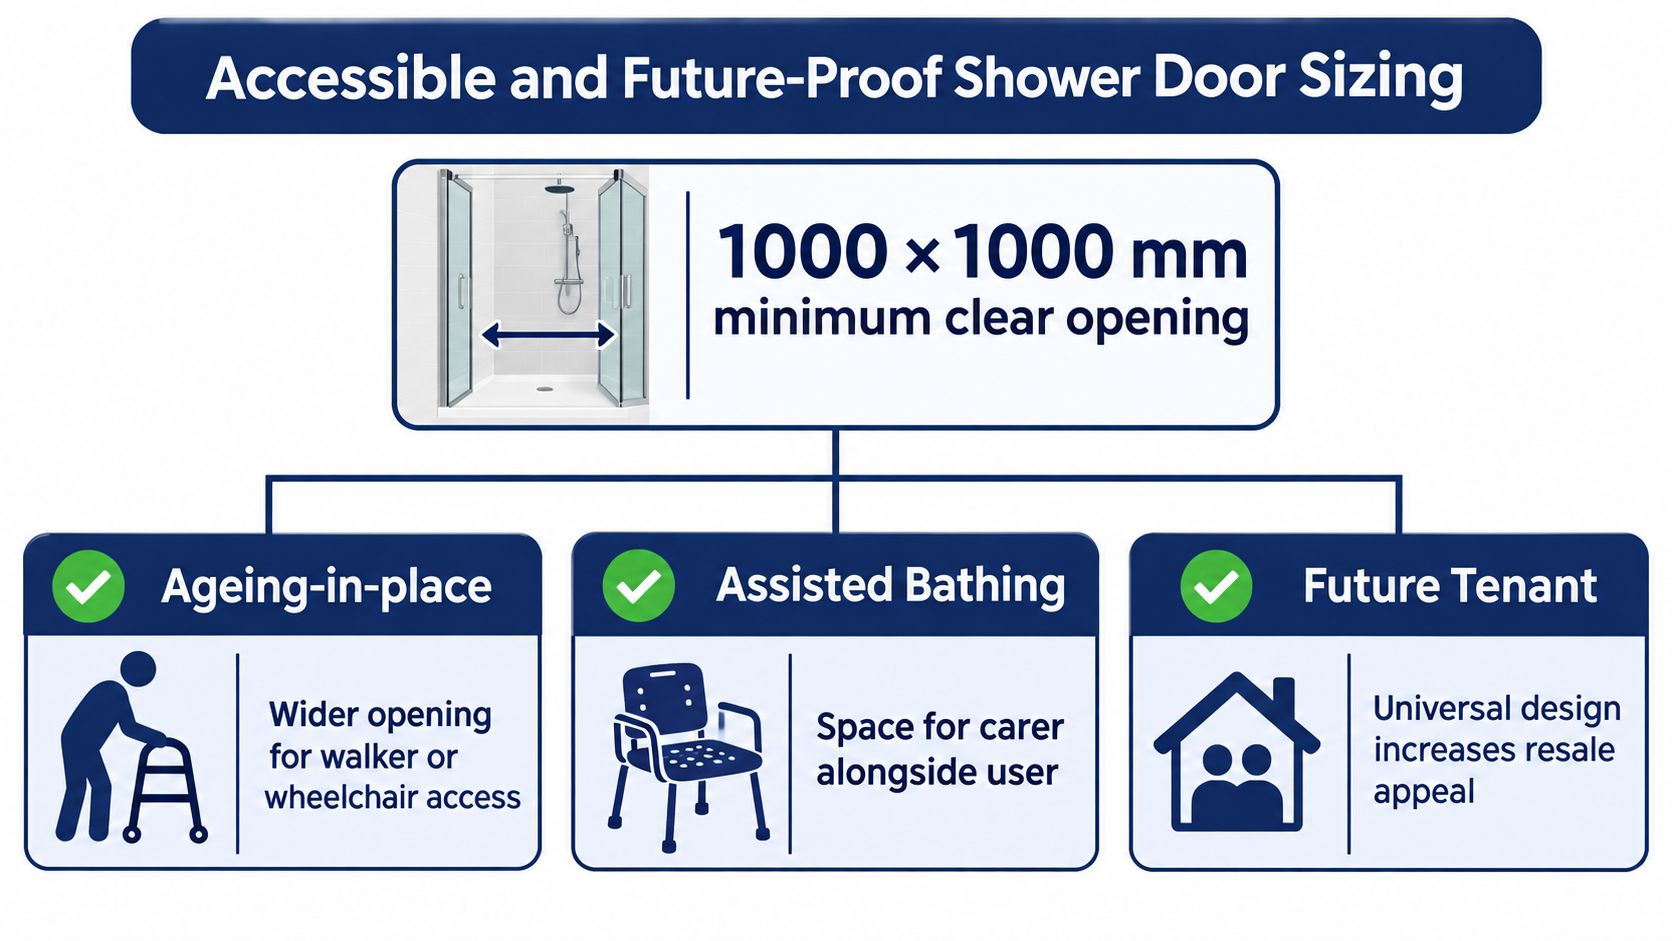
What to anchor your plan to
A future-proof bathroom should protect three things at once, the showering area, the turning space, and the escape route. If one of those gets blocked by the door, the layout stops being adaptable. That's why a wide fixed panel with a narrow opening can be a poor fit even when it looks substantial.
The room footprint matters too, because accessible guidance points to layouts that preserve choice and flexibility for fittings and orientation. In practical terms, the best plan is the one that still works if the user's mobility changes later.
When a Curtain Beats a Glass Door
A glass door isn't automatically the better answer. It gives stronger splash control, but it also adds a threshold, a swing arc, breakage risk, more cleaning, and a permanent obstruction that can get in the way of future grab rails or a shower chair. In some compact or adaptable rooms, that cost is too high.
A weighted curtain can be the better option when access matters more than a sealed look. A partial fixed panel can also work well if it controls spray without stealing the only entry route. The right choice depends on the user, the falls, the ventilation, and how much water the room can safely contain.
Use the room conditions to decide
If the shower will be used with assistance, keep the opening generous and avoid anything that traps the user behind glass. If splash containment is the main concern, a carefully positioned panel may be enough. If the bathroom is small and the door would dominate the circulation line, a curtain often leaves the space more usable.
A rigid enclosure can improve splash control yet also introduces a threshold, swing arc, breakage risk, cleaning burden, and a permanent obstruction, while a larger opening with a weighted curtain may be more adaptable provided falls, drainage, waterproofing, and ventilation are properly designed. That's a real trade-off, not a theoretical one.
Shower Door Commissioning Checklist
Before you order, run the bathroom through a final check on site.
- Confirm the finished opening. Use the tiled wall-to-wall dimension, because the bare tray figure can be misleading.
- Confirm the swing or slide path. The door has to move without hitting the WC, basin, or the only route through the room.
- Confirm the adjustment range. The enclosure must suit the actual finished width, not the nominal tray size.
- Confirm turning space. If the bathroom needs accessibility now or later, the 1500 mm zone has to stay clear.
- Confirm tile and build-up allowances. Waterproofing, adhesive, and wall finish thickness all change the fit.
- Confirm the escape route. A door should never trap someone inside the shower space.
- Confirm the wet area detail. If the tray or floor build-up is failing, fix that first and avoid hiding the problem with a new screen.
If the layout is meant for assisted use, or if you're changing the room structure rather than swapping a like-for-like screen, that's the point to escalate to a full accessibility check or building control sign-off. The door is the last decision, not the first.
For sealing and long-term water protection around the enclosure, details matter just as much as the glass. A careful check of bathroom waterproofing tape helps prevent the sort of leaks that make a neat shower door job fail later.
Quick Reference and Where to Go Next
Keep the key numbers in one place, because that's what helps on site when the tiles are going up and the measurements have to be trusted.
| Measurement | Typical value | Where it applies |
|---|---|---|
| Compact domestic shower enclosure | 760 × 760 mm | Tight household bathrooms |
| Practical standard enclosure | 800 × 800 mm | Small to mid-size domestic showers |
| More comfortable enclosure | 900 × 900 mm | Better movement space |
| Accessible shower area | 1200 × 1200 mm | England guidance for accessible level-access showers |
| Smaller accessible shower area | 1000 × 1000 mm | Permitted in a WC or cloakroom context |
| Clear turning circle | 1500 mm | Accessible bathroom layouts |
| Clear door opening benchmark | 775 mm or 850 mm | Depends on the applicable Part M category |
| Useful entry clearance in compact rooms | 600 to 610 mm | Practical planning benchmark in front of the enclosure |
The door that fits best is usually the one that respects the finished opening, the room's circulation, and the user's future needs at the same time. If you're unsure where your layout lands, the next step is a proper site survey, then a quote based on the actual tiled opening and the room around it.
Seby Bathroom Renovation handles bathroom layout, fitting, tiling, plumbing, and accessibility upgrades across Folkestone and Kent, so the shower door choice gets judged as part of the whole room, not as an isolated product. If you want a bathroom that fits properly after the tile goes on, visit Seby Bathroom Renovation to arrange a survey and talk through the layout before you order the enclosure.
Published via the Outrank app