Leaking Shower Tray: Causes, Quick Fixes, and Repair Options
Diagnose a leaking shower tray, stop the drip fast, and decide between repair and replacement. Practical guidance for Folkestone and Kent homeowners.

You've wiped the tray, checked the screen, and the damp patch is still back the next morning. Maybe the skirting has started to swell, or there's a stain showing through the ceiling below, and the bathroom still smells faintly musty even after you've aired it out. At that point, the question isn't whether the shower is “a bit leaky”, it's which part of the system has failed, and whether a sealant gun will actually solve it.
A leaking shower tray is usually treated as one object going wrong. That's the mistake that wastes money. In practice, the leak can come from the seal, the waste, the tray body, or the substrate beneath and around it, and each one leaves different clues. If you can prove which pathway is responsible before spending on silicone, you stand a far better chance of stopping the damage before it reaches floors, ceilings, or adjoining rooms.

Why a Leaking Shower Tray Demands Fast Attention
A tray leak rarely stays local. One day it's a damp edge or a patch of loose grout, the next it's a stained ceiling below, a swollen skirting board, or a smell that won't shift because water has got into materials that don't dry quickly. In bathrooms, the visible symptom is often the last thing to show up, not the first.
That matters because bathrooms are a major origin point for escape-of-water incidents. Zurich's UK residential risk guidance, citing Association of British Insurers research, reports approximately 238,000 escape-of-water insurance claims in 2020 at an average cost of £3,170 per claim, and says the average cost was 50% higher than in 2014. The same guidance notes that nearly one in five buildings-and-contents claims involved escape of water, and insurers were paying approximately £2.1 million per day for this type of damage. Zurich's residential escape-of-water guidance
What the hidden damage looks like
A slow leak doesn't need much drama to become expensive. Failed seals, movement, cracked trays, defective waste connections, and poor waterproofing can let water reach flooring and subfloor materials repeatedly before anyone notices. That repeated wetting is why a one-hour inspection can be worth far more than a weekend spent chasing symptoms.
Practical rule: if water is reaching anything below the visible tray line, stop thinking in terms of “a small bathroom repair” and start thinking in terms of property protection.
The risk is spread. Water can travel under vinyl, behind tile backer boards, into joists, or across to adjacent rooms before showing up where you expect it. That's why the first job is to separate the four leak pathways, not to smear sealant around the obvious edge and hope for the best.
The Four Common Causes of a Leaking Shower Tray
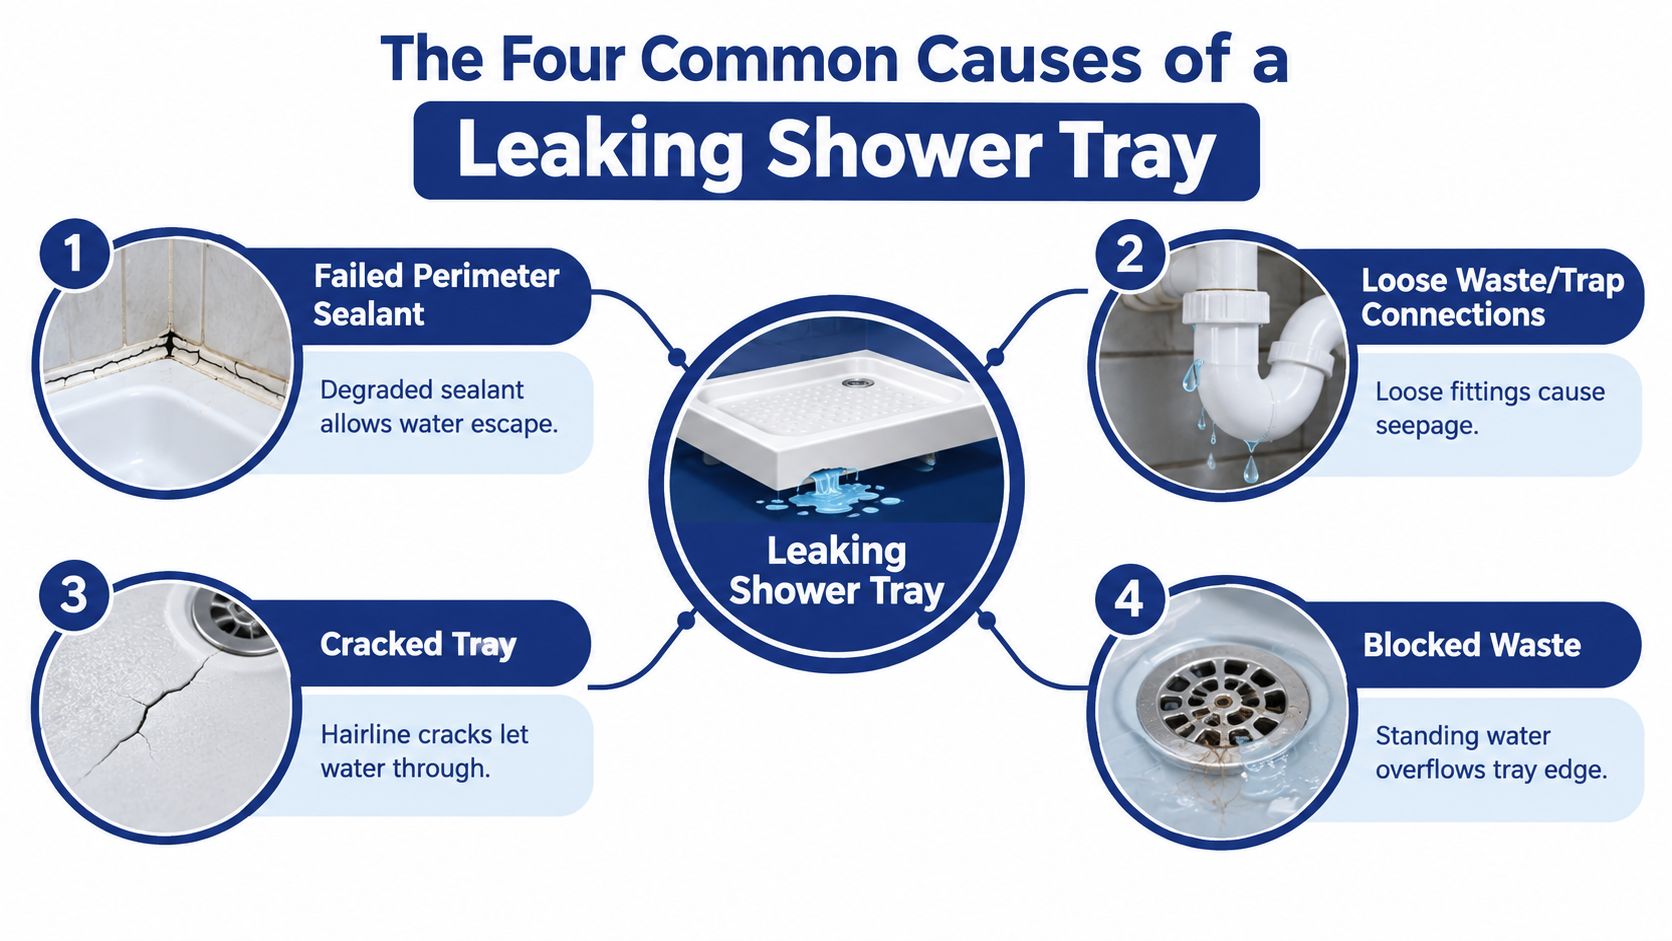
Failed perimeter sealant
This is the common one, and it's the easiest to misread. The bead at the tray edge, enclosure junction, or screen joint cracks, lifts, or separates from the surface, and water starts tracking behind it whenever the shower runs. You'll often see discoloured sealant, darkened grout at the edge, or moisture that seems to start at one corner and spread.
Loose or blocked waste connections
If the leak shows up when the waste is loaded with water, the trouble may be in the waste body, trap, or compression seal rather than the visible tray edge. A loose fitting, a poor compression seal, or drainage that backs up can all dump water where it shouldn't go. In practice, this often looks like seepage below the tray rather than a wet perimeter.
Cracked or flexing tray body
A hairline crack is easier to spot on some materials than others, but tray flex is often the bigger problem. When the tray moves underfoot, seals are stressed, joints open and close, and the same repair keeps failing. If the tray looks sound but the leak returns after resealing, the movement under load deserves attention.
Water getting behind the finish
This is the hidden one. Penetrating damp in English housing rose from 1% in 2019 to 2% in 2024, and serious condensation or mould rose from 2% to 3% in the same period, according to the English Housing Survey figures cited in Oxford's damp and mould policy. Oxford council housing damp and mould policy
That doesn't prove a tray leak, but it shows why trapped moisture matters. If waterproofing behind the tiles has failed, or the substrate is already wet, water can move into walls and floors even when the visible finish looks intact.
A tray can look tidy on top and still be failing underneath. The visible bead is only one part of the system.
Quick matching guide
- Leak only when showering hard: suspect the seal or enclosure junction.
- Leak appears when water sits in the waste: suspect the waste or trap.
- Tray moves underfoot: suspect the tray body or support.
- Leak keeps returning after resealing: suspect the substrate or hidden waterproofing.
How to Diagnose Where the Leak Is Actually Coming From
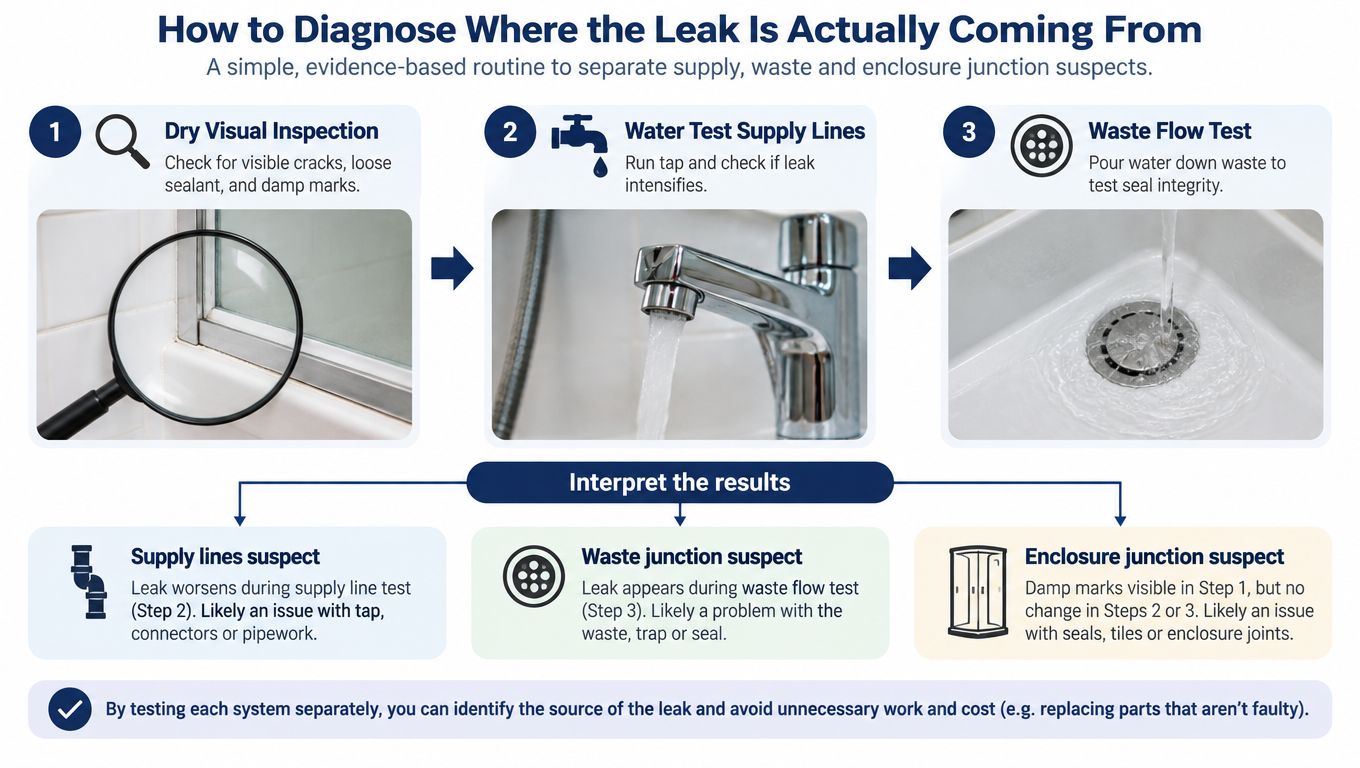
Start dry. Wipe the tray, enclosure, waste cover, screen drainage slots, and the floor at the edge of the shower. Then look for cracked or discontinuous sealant, movement at the tray, water marks below, and anything that suggests the leak has been happening for a while rather than just once.
Isolate the water path
The cleanest way to avoid guesswork is to separate supply from waste and then test the junctions. First run the shower head into a bucket so you can check the supply without wetting the enclosure. Then discharge measured water directly into the waste to see whether the waste assembly holds. After that, spray each wall-to-tray and screen junction separately while someone checks the underside or ceiling below.
Practical rule: never reseal first and test later. If you guess wrong, you've hidden the evidence and paid for a repair that can't hold.
That sequence matters because it stops the usual expensive mistake, which is wrapping fresh silicone over a leak that's coming from the waste or the substrate. A neat bead can mask the symptom for a short time, but it won't solve a misaligned waste, a damaged tray, or a failed junction below the surface. The controlled test needs to answer one question at a time.
If the leak is obvious below, document it before you disturb anything else. A quick photo and, where available, a damp-meter reading help a tradesperson verify whether the problem is active moisture or old staining. If you see moisture reaching joists, ceilings, or wall cavities, stop repeated testing and move to investigation rather than continuing to soak the area.
Quick Containment You Can Do Today
The safest first move is to take the shower out of use until the source is clearer. If water is still entering the failed joint or waste, every extra shower adds to the wetting cycle, and that's what makes minor damage spread into flooring and finishes.
Dry the enclosure thoroughly with towels, then keep the room aired out as much as possible. If water is dripping through below, protect the ceiling or floor beneath with a dustsheet rather than letting moisture sit there. If the tray is visibly flexing, a temporary weight can sometimes reduce movement long enough to limit stress, but it's only a holding measure.
What to avoid
- Do not pour cement-type filler or sealant into the waste.
- Do not paint over a stained ceiling to hide active moisture.
- Do not add fresh silicone over wet, dirty, or mouldy surfaces.
- Do not keep using the shower if water is reaching below the tray line.
If you need a temporary waterproofing reference while planning the repair, this guide on bathroom waterproofing tape is useful background, but it won't replace proper diagnosis or a sound substrate.
The point of containment is simple. Buy time, protect the room, and stop adding water to a failure you haven't isolated yet. A bead applied over a wet substrate usually fails again because the underlying path is still open.
Repair or Replace How to Decide
The honest decision starts with the tray itself. If it's an acrylic tray that's still reasonably rigid, access is decent, and the damage is localised to the seal or waste area, a repair often makes sense. If the tray flexes, the waste is hard to reach, or water has already damaged the structure around it, replacement is usually the cleaner answer.
What points toward repair
A repair is more likely to hold when the issue is limited to a failed perimeter seal, a tired waste seal, or a junction that can be dried out and properly reinstated. It also makes more sense when the substrate is still sound and the tray hasn't been moving under load.
What points toward replacement
If the tray body is cracked, the support underneath is poor, or moisture has spread into the surrounding structure, the system has already moved beyond a surface fix. High-flow showers need special care too. NHBC guidance uses a 12 L/min threshold for higher-risk installations, and at or above that rate, wet rooms and similar arrangements need a full approved tanking system rather than a simple re-seal. NHBC substrate and shower enclosure guidance
| Signal | Repair likely sufficient | Replacement usually needed |
|---|---|---|
| Sealant has split at one junction | Yes, if substrate is dry and sound | No, unless the leak has spread |
| Waste leaks but tray is rigid | Yes, if access and fittings are serviceable | No, unless fittings are cracked or misaligned |
| Tray flexes underfoot | No | Yes |
| Moisture has reached timber or cavities | No | Yes |
| Shower is high-flow or wet-room style | Only if the full junction detail is proper | Often, unless the system is rebuilt correctly |
The practical trade-off is disruption versus certainty. A local repair is quicker and cheaper in the short term, but it only works if the rest of the system is stable. A replacement is more invasive, but it lets you correct support, waterproofing, and junction details at the same time.
What a Professional Repair or Replacement Actually Involves

The good jobs start by stripping the enclosure back enough to see what's going on, not by smearing sealant over the visible joint. Old silicone comes out mechanically, the tray edge is cleaned and degreased, and the substrate is checked for swelling, rot, or soft spots before anyone decides what to refit.
If the tray is staying, the waste and trap need to be verified as accessible and leak-free. If the floor or wall finish has been opened, the waterproofing behind it should be reinstated as a proper system, not patched with a cosmetic bead at the end. NHBC guidance says waterproofing should create an impervious layer behind tiles and recommends trays with integrated upstands where applicable to reduce junction penetration. NHBC substrate and shower enclosure guidance
What good sequencing looks like
- Remove failed materials first: silicone, loose adhesive, and damaged filler have to go.
- Check support next: a rigid, properly supported tray behaves differently from a flexing one.
- Rebuild the junctions: use compatible sanitary sealant only after the surfaces are clean and dry.
- Test before sign-off: a staged spray test should be followed by a repeat inspection below and at adjacent skirtings.
The acceptance test matters as much as the repair itself. A competent contractor should not hand the job back until there's no visible moisture migration after the shower junctions have been sprayed and the underside has been checked. If the repair only looks neat, that's not enough. It has to stay dry under test.
When to Call a Bathroom Professional and What to Ask
If the tray flexes, water has reached a ceiling below, mould keeps returning after cleaning, or the leak seems to involve the substrate, the job has moved past DIY territory. Those are the signs that the system needs proper strip-out, not another quick bead of sealant.
For homeowners, landlords, and managing agents in Folkestone and Kent, the smart questions are simple. Ask whether the contractor will check the substrate, what waterproofing system they'll use, whether they'll tank-test the installation, and what their guarantee covers.
Prioritise these warning signs
- Water below the tray line: especially where joists or ceilings are affected.
- Repeated leak after resealing: usually means the diagnosis was wrong.
- Tray movement under load: points to support or structural issues.
- Musty smell or recurring mould: suggests moisture is still trapped somewhere.
A prompt inspection usually costs far less than chasing a full trace-and-access issue after the damage has spread. Zurich's figures on escape-of-water claims make the logic plain, early action is cheaper than extensive drying, making good, and reinstatement. Zurich's residential escape-of-water guidance
Visit Seby Bathroom Renovation if you need a practical bathroom repair or replacement in Folkestone or Kent. Their team handles leak diagnostics, waterproofing, tiling, and full bathroom work, so the tray, substrate, and finish can be dealt with as one job instead of a string of callbacks.
Drafted with Outrank tool